Meeting this Thursday July 17 2014
7 PM, Room A
Daybreak Community Center
4544 Harvest Moon Dr.
South Jordan, UT
7 PM, Room A
Daybreak Community Center
4544 Harvest Moon Dr.
South Jordan, UT
On Memorial Day, some skilled Amateur Radio Operators did some MESH testing using Linksys WRT54G routers (standard home type Wi-Fi router) running Broadband Hamnet, and also Commercial Ubiquiti Bullets running the standard Ubiquiti operating system load with some amazing results!
First Ed Sim(N7RTA) and Charles Gray (KE6QZU) made the trek up to the radio sites on Ensign Peak and set up several MESH test nodes to cover the valley below. The most successful was a WRT54G Linksys home router running Broadband Hamnet on Channel 1 of the 2.4 GHz Wi-Fi Band, fed into a one watt Renasis bi-directional amplifier, and then out to a 17dbi sector antenna (spec sheets attached). (On the map below, Ensign Peak is the little black radio tower symbol with the purple “X” by it.) Transmitting from there, they obtained the following results:
First Jerry (W0HU) and and Judy (W0ZTD) Spillman located at the Heritage Baptist Church located at 1502 Walnut drive just east of the Salt Lake City Airport reported up to 75% link quality at that location, with a clear line of sight to the Ensign Peak MESH node. They monitored signals there, and experimented with several configurations of the WRT54G Linksys routers running Broadband Hamnet, and with various antenna configurations. He was even able to wirelessly hop a signal inside the building to another router there, and connect to his computer inside!
Carlos Cardon (W7QL) was at Flat Iron Mesa in Sandy (about 8600 South and 1700 East) with a Linksys WRT54G router running on Broadband Hamnet, and fed into a 1 watt bi-directional amplifier, and then to a 24dbi gain parabolic antenna. He was able to pick up the signal from Ensign Peak with signal Quality at first ranging from 83% to 100% (see attached Word file with pictures of his MESH status). As the day went on, his received signal quality at that location degraded noticeably. He was not able to resolve the SSID being transmitted from Ensign, just the IP address, indicative of a signal level problem on one side of the link, probably a level imbalance. He also indicated, a not totally clear line of sight due to vegetation in the signal path, which will definitely effect the signal. But, if you see on the distance scale to the left of the map below, the distance was about 15 miles! On the way out, he found a spot to set up next time that has a clear line of sight, clear of vegetation.

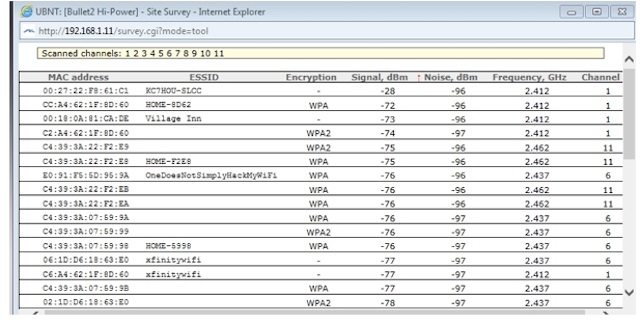
At the same time, testing was being done at the SLCC (Salt Lake Community College) MESH hub site on top of the five floor Technology Building (the green antenna tower in the middle of the map at the top of the close cluster of three towers). At that site, a Ubiquiti Bullet HP running the standard Ubiquiti operating system is feeding into a HG2415U-PRO 15dbi Omni-directional antenna (specs attached). Using this Bullet belonging to Grant Gardner (KC7HOU), I believe a signal level record for Point to multipoint Wi-Fi in Utah may have been set! Linking from the node at SLCC to a site near the Taylorsville Food Pantry, a signal level of -24db with a Signal to noise ratio of 68db was recorded! (See the attached snapshot confirmation labeled “Taylorsville Food Pantry Levels”) In the typically understated words of the Magna Utah Storehouse ERC director, Joe Maughan (AA7J) – “that should be good enough!”
The equipment being used at the Taylorsville Food Pantry site was another Ubiquiti Bullet HP fed directly into a 24dbi gain parabolic antenna. Even though the distance was less than one mile, just try and get that kind of signal level in your own home sitting right next to your Wi-Fi router!
The SLCC site is up and running 24 hours a day, but remember, it is a regular Wifi 2.4GHz output on channel one (the SSID is KC7HOU-SLCC). Due to technical and monetary issues, it is not yet using the Broadband Hamnet SSID, and because of that, we are not yet able to link it to Ensign, but that is planned. In fact, we have a plan A and a plan B to make that happen!
More testing will be done in the future, and eventually, the Grand Plan is the map below – linking many more sites around the valley, with the ability for any Ham with the right MESH equipment to link in to the nearest site of this valley wide Ham Radio high speed private Internet with some simple equipment. This will allow Amateur Radio Operators to tap into it to send high speed data and link video and voice contacts around the valley.
In an emergency, when power, cell phones, landline phones, and regular Internet service is down, it could be a very valuable emergency resource.
Setting this system up is making progress, slow albeit. I was told very emphatically by a member of the state emergency staff, that this (Plan) would probably not be technically possible, and the equipment alone would cost close to $100,000! Ham Radio Operators tend to get things like this done for a heck of a lot less, as we simply do not have that kind of money, and most of us do not realize that it is “technically not possible”!
If you would like to be involved in this Grand Plan for a wireless private Ham high speed internet for the valley, please contact one of the Hams mentioned – we would be glad to have your help.
David T. Bauman
KF7MCF
Magna Utah Bishop’s Storehouse
Emergency Response Communications


7 PM, Room A
Daybreak Community Center 4544 Harvest Moon Dr. South Jordan, UTHi All
We do or will have access to Ensign Peak Saturday May 24th. Both Ed and I plan to be on Ensign Peak an will set up a test node there at 9:00 AM. Weather permitting, but is looks good, so far. Ed and I will meet at his home Saturday between 8:00 and 8:15 to transfer gear and car pool to Ensign Peak. We will be running Broadband Hamnet 1.0.0 on channel 1. So far we have the following who are willing to help.
Ed Sim (N7RTA)
Charles Gray (KE6QZU)
Brad Rupp (AC7BR)
Carlos Cardon (W7QL)
We will use the Ensign Peak Repeater for voice communications. 146.700 – 100 KD0J
We will try to connect to the L-3com mesh node about 3 miles away. They will have a directional antenna pointing at ensign peak. Ed, do you have the GPS location for the L-3com site?
Brad, do you have any idea where you will be located? Please provide the GPS for your location if you can. Also we would like to know the equipment you will be using, router type, node name, antennas and if you are using an amplifier and it’s gain.
Carlos, do you have any idea where you will be located? Please provide the GPS for your location if you can. Also we would like to know the equipment you will be using, router type, node name, antennas and if you are using an amplifier and it’s gain.
David and Grant, You mentioned testing the SLCC link at the same time. Is that a go? Do you have the GSP location of the SLCC link?
Hi All
We plan on doing mesh testing from ensign peak. Assuming the weather is good, we would like to run the test on may 24th, with a backup of the 26th (memorial day). We will start at about 9:00 AM. We hope to get as many involved as possible. Currently we are waiting on access to the ensign peak site. The test will consist of setting up a temporary node (running broadband hamnet 1.0.0 on channel 1) on ensign with an 8 dBi omni and no amplifiers. The temporary node will collect signal strength information from each node it sees using the mesh-server data collection script. We will use 147.600 – 100 (kd0j) SLCOARES repeater on Ensign Peak for voice communications. As the date nears we will update everyone interested in helping. If you are interested in helping, please add a comment to this post.
This server is currently on a dynamic IP address and we have been using DynDNS’ free service for domain resolution. Unfortunately DynDNS decided to discontinue this free service on May 7 2014.
Basically, after this date the site/domain will no longer work (unless you know the IP address.)
We are in search of a new dynamic DNS provider and will contact those registered with the new Web address once the move is complete.
Thank you and sorry for the inconvenience.
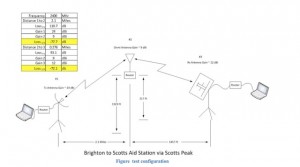
Preliminary investigation in to the terrain profile using google earth, indicated that a direct link between the Brighton Aid station location and the Scotts Peak Aid station location would be difficult. It was determined that an intermediate node on Scotts peak was needed.

Brighton – based on results outlined in the July 2013 QST article “A Broadband Ham Network Crosses the Finish Line”, by Lynn Jelinski, AG4IU. It was decided that testing would start without the use of amplifiers,then if needed we would add amplification. The basic configuration is as shown (see 1 and 2):
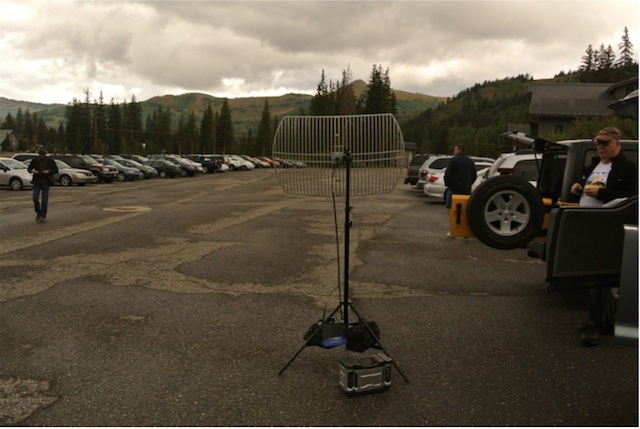
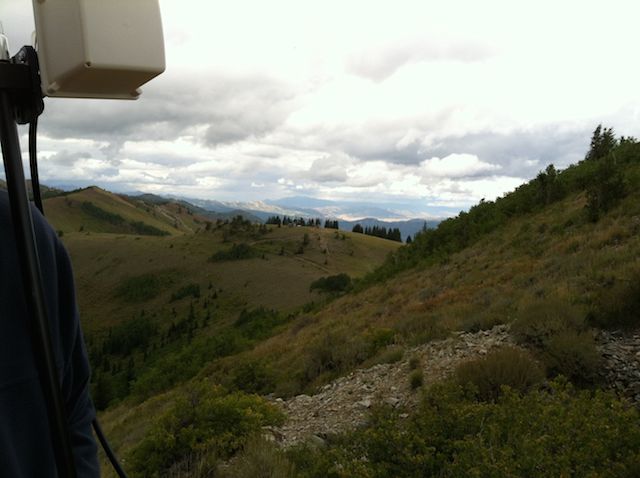
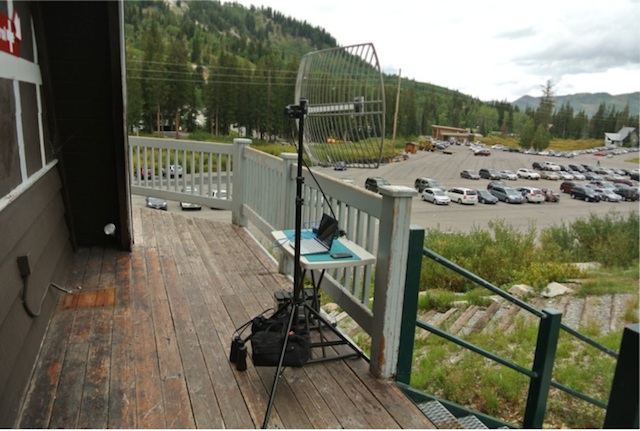
A group of us wanted to do a pre-race mesh test to verify that what we had calculated would work to connect Scotts Peak Aid station with the Brighton Aid station. The members of the group were Brad Rupp (AC7BR), Steve Baxter (K7SRB), Joseph Gray (Ke7MQZ), Ed Sim (N7RTA) and Charles Gray (KE6QZU). We decided to do the testing on Labor Day, as we had that day off work. We had planned to start using just the routers without amplification and then add the amps if needed. We were planning on a mesh node at the Scotts Peak Aid station. This node would have a directional antenna pointing to Scotts Peak where we would have another mesh node that would connect Scotts Aid station to the Brighton Aid station. The Brighton Aid station node would have a 24 dbi parabolic antenna pointing to Scotts Peak. Ed set up the Brighton Aid station node in the parking lot near the location that would be used during the Wasatch 100 Ultra Marathon. This gave us a somewhat clear LOS (Line Of Sight) to Scotts Peak. Here is a picture of that node.

The rest of the group headed to Scotts Peak and Aid station to setup our nodes. Steve set up his node at the Scotts Peak Aid station location. His node used a 4″ 12 dbi cube antenna aimed at Scotts Peak. Brad Joseph and I headed to Scotts Peak to setup the relay mesh node. We found that on the peak it was very windy and looked for the best location to setup the mesh node. We found a location down from the peak where we could see both the Brighton Aid station and the Scotts Peak Aid station. We set up our node using a 4′ 12 dbi cube antenna and an 8 dbi omnidirectional antenna. Here is a picture of the Scott’s Peak node. I could not find a picture from the Labor Day test, but found a picture of the node during the event.

We of course used our HTs to communicate. Boy were we surprised with the results. We discovered that the Brighton node could see our node at Scott’s Peak just as good as the node at the Scotts Peak Aid station. Even with the cube pointed at Scotts Peak and not at Brighton. That meant that we did not need the relay on Scotts Peak. Ed then moved his node to where it would be used during the race. After the move the signal increased and we had an even better link. We decided to set up a TeamTalk server and try it out. I set a Rpi node with TeamTalk on the ground with a 5 dbi antenna. To our surprise, Brighton could also see the Rpi node. The signal was weak and only showed up as an IP address at Brighton, but we could now use the TeamTalk server to communicate over the mesh network. At this point we decided to take down the Scott’s Peak node. With this testing done we decided to go home. We had established a good usable mesh link between the Scott’s Peak Aid station and the Brighton Aid station that had a good LQ and signal strength without any amplifiers.
On Friday evening around 5:00 PM, September 6th we set up for the race. I had created a Rpi mesh-server that provided an Access Point for the Brighton node. This allowed us to connect to the Brighton node via WiFI from our computers. This mesh-server also ran a TeamTalk server and had many of the mesh and TeamTalk files. We also added an IP camera to the Brighton mesh node. We were all set at the Brighton Aid station. The Scotts Peak Aid station took some time to get setup. When they finally did get the mesh node up, they found that the PC they were using did not have a TeamTalk client installed. They connected to the mesh-server and down loaded the TeamTalk client to the PC. They then installed and configured TeamTalk and we were in business. From then on everything worked well…. worked well….. worked well. Yep we did have some problems with the Access Point on the mesh-server. Every now and then the WIFI would stop working and then would start back up at some later time. This was just the AP WIFI. The mesh-server did not die and we did not lose the mesh connection. It was just the PCs using the AP WIFI at Brighton were affected. The node at Scott’s Peak could use the IP camera connected to the Brighton mesh node. TeamTalk worked well also. We did a demo for the Wasatch 100 directors and they were very impressed.
Weeks later we concluded that the four PCs with VOIP and Video running at the same time caused the WIFI adapter on the Rpi over heated and would stop working until it cooled down and would start working again. This happened several times and we spent a lot of time trying to figure what was going on. We checked the mesh-server and the mesh connection and everything looked good.
One of the things that we learned from this experience was that we needed an automatic way to gather the LQ and the signal to noise ratio from the mesh nodes as we had forgotten again to record the LQ and signal to noise ratio during the race.
Here are more of the pictures from the Monday testing.


This describes some antenna testing done by Ed Sim, N7RTA, Ryan Vandyke KF7RUQ, Jon Packer, KE7QOF and Charles Gray, KE6QZU. This test was conducted in the park north of the Daybreak Community Center, were we have our meetings on the third Thursday of each month at 7:00 PM. The testing was done on Thursday June 20, 2013. We started about 7:30 PM. The following equipment was used for the tests.
The pictures that I took during the test were lost. (Hard disk crash on my laptop) I do have some pictures that were taken by Ed (N7RTA). I also have similar pictures from a later test that I will use.
We set up a mesh node on each of the tables powered by a battery. We started with the standard 3.5 dBi antennas on each router. Each router was configured to use the right antenna. We wanted to see how each antenna performed, and what kind of distance we can get. The first set of data we collected at each location was with the standard antenna. This was to be a reference that we could use to compare the difference in readings when the antenna on the node at location #2 and later location #3 was changed to one of the other antennas. We first made sure that the routers were working with the tables located next to each other. Then one of the tables was moved to until the signal disappeared from location #1. We then moved the table closer so we could connect. This was called location #2. After gathering data for all the antennas from location #2 the node was moved to location #3 and we repeated the process. (Well almost) All the readings were taken from the node at location #1. The GPS readings for the locations are as follows:
Here is a view of the test site.

#1) 40° 32’25.98” N, 111 ° 59’ 54.9” W
#2) 40° 32’ 25.98” N, 111° 59’ 57.48” W
#3) 40°32′ 26.196″ N, 112° 3′ 40.32″ W
Location #1 to location #2 distance is 201 ft. The free space loss is: 75.8 dB at 2.4 GHz

Location #1 to location #3 distance is 748 ft. The free space loss is: 87.2 dB at 2.4 GHz

We learned a lot from this experience. We discovered that we would like readings from both of the nodes used in the test. We also needed two computers to gather the data. We found that when we powered off the node at station #2 and changed the antenna we sometimes also had to reboot the router at station #1 to get readings. this also occurred when the node at location #2 was moved to location #3. We also discovered that the wind could remove the laptops from the tables. (The laptops slide on the table tops very well and the display worked well as a sail.)
Here is a picture of a table set up at location #1 from a later test.

Here is a picture of the tripod used at location #2 and #3

Here is a picture of the tripod used at location #1

Here is a picture of the 8 dBi antenna
Here is a picture of the 12 dBi Cube.

Here is a picture of the 16 dBi Yagi

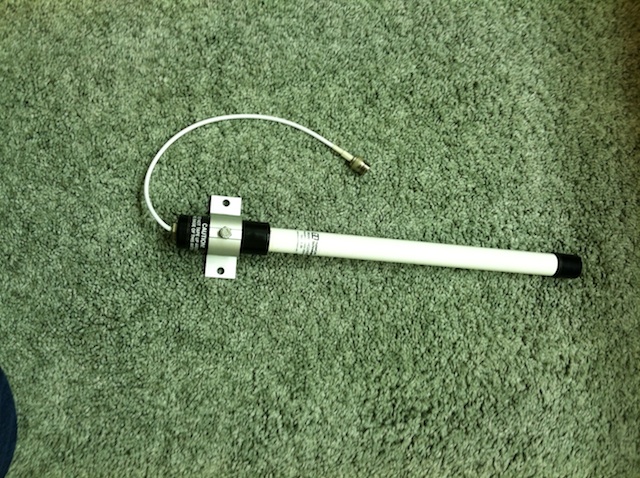
Here is a picture of the 15 dBi omnidirectional antenna

Here is the data that we collected
|
Test # |
Site # |
Antenna |
Site # |
Antenna |
Signal dB |
*Gain |
Noise dB |
Signal/Noise dB |
|
|
1 |
1 |
3.5 dBi |
2 |
3.5 dBi |
-95 |
0 |
-88 |
-6 |
|
|
2 |
1 |
3.5 dBi |
2 |
8 dBi |
-81 |
7 |
-88 |
7 |
|
|
3 |
1 |
3.5 dBi |
2 |
16 dBi Yagi (1) |
-89** |
6 |
-88 |
-1 |
|
|
4 |
1 |
3.5 dBi |
2 |
16 dBi Yagi (1) |
NA |
NA |
NA |
NA |
|
|
5 |
1 |
3.5 dBi |
2 |
12 dBi Cube |
-60 |
35 |
-87 |
27 |
|
|
6 |
1 |
15 dBi |
2 |
3.5 dBi |
-71 |
24 |
-85 |
14 |
|
|
7 |
1 |
3.5 dBi |
3 |
3.5 dBi |
NA |
NA |
NA |
NA |
|
|
8 |
1 |
3.5 dBi |
3 |
8 dBi |
-76 |
NA |
-87 |
11 |
|
|
9 |
1 |
3.5 dBi |
3 |
16 dBi Yagi (1) |
-87** |
NA |
-88 |
0 |
|
|
10 |
1 |
3.5 dBi |
3 |
12 dBi Cube |
-71 |
NA |
-88 |
17 |
|
|
11 |
1 |
3.5 dBi |
3 |
16 dBi Yagi (2) |
-75 |
NA |
-90 |
16 |
|
|
12 |
1 |
3.5 dBi |
3 |
15 dBi |
NA |
NA |
NA |
NA |
|
|
13 |
1 |
16 dBi Yagi (2) |
3 |
12 dBi Cube |
-51 |
NA |
-89 |
38 |
|
|
14 |
1 |
15 dBi |
3 |
12 dBi Cube |
-63 |
-88 |
25 |
||
|
15 |
1 |
15 dBi |
3 |
8 dBi |
-71 |
-88 |
16 |
||
|
16 |
1 |
15 dBi |
3 |
3.5 dBi |
NA |
NA |
NA |
NA |
|
|
17 |
1 |
16 dBi Yagi (2) |
3 |
3.5 dBi |
-75 |
NA |
-90 |
16 |
|
Test #1 is the reference. The signal level shown is the minimum level (for this router) to maintain a link.
* gain as represented here is not dBi, rather it is with respect to the standard antenna shown and is estimated based on signal strength.
** this data represents an anomaly! Based on spacing you would expect ~11dB difference.
Data shown in test #11 was not measured, it is based on reciprocity with test #17
For the past year Charles KE6QZU and Joseph KE7MQZ have been working with mesh on the Raspberry Pi. There have been a few challenges but it is working and able to communicate with other v0.4.3 nodes. Currently the web interface is basic and most of the settings are changed via script or config files.
Over the next few months they will be working on a simple web interface like the one used by BB-Hamnet and then making it available for testing by a select few prior to release.
If you are interested in testing please leave a comment.
Welcome to the Wasatch Meshers site! This site was created to be a focus point for the ham radio mesh activity in the Utah Wasatch area. It should be used as a single location to find out what is going on with mesh in the Wasatch area, and how to get involved. If you are a licensed ham and would like to learn about mesh, you have come to the right place. There are several groups in the area, working with mesh. We invite everyone to add their knowledge and experience to this site, so everyone can benefit, improve and expand the mesh network in the area.
We encourage every ham interested in HSMM-Mesh/Broadband-Hamnet to register so you can access all the gathered information and add your information. You MUST use your FCC callsign as a login ID.